Cootie Catcher Valentine — Let your Love Choose the Message!

Cootie Catcher Valentine –When you just can’t decide what sentiment to share!
Bring your Childhood Back with a Cootie Catcher Valentine
When making Valentine’s Day crafts, I thought back to some of the games I enjoyed from my childhood. The one that stuck out the most was the cootie catcher, or paper fortune teller game. When it came to cootie catchers, making them was half of the fun because you make up the end results for your friends!
Valentine’s Day Crafts with Martha Stewart
Martha Stewart Crafts is hands down my favorite craft supply company. The variety of products that they carry for everyday occasions, as well as holidays, helps me complete my projects with ease. For this project, I used:
- Valentine Cupid Stickers ($3.49)
- Valentine Hearts Wood Stamp Set ($19.00)
- Doily Lace Edge Punch ($16.49)

Martha Stewart Crafts Valentine Products Including Cupid Stickers and Heart Stamps
Being a paper crafter, I have used punches for years and have found none that are as great in quality as the ones carried by Martha Stewart Crafts. They don’t bend my paper and have handles in all the appropriate places so I know exactly how much pressure is required. Standard cootie catchers are not very exciting, so I decided to jazz them up a bit by making them Valentine’s Day themed.
Cootie Catcher Instructions
#1. Fold a piece of 8 ½ x 11” paper over to make a square. Cut off the excess strip using scissors.

Cut Paper
#2 Unfold the square and refold it the opposite direction, following the diagram below.
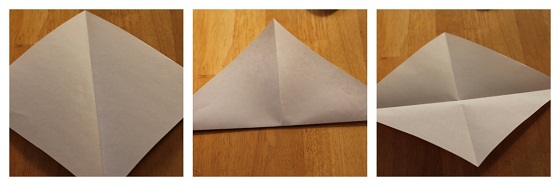
Fold Paper
#3 Fold all four corners of the paper in toward the center.
Fold Corners
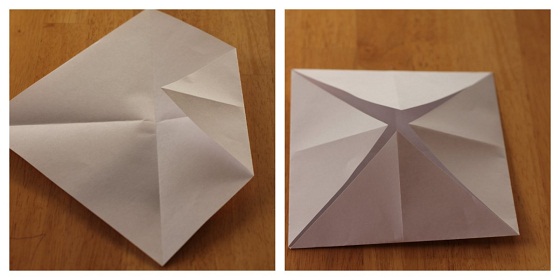
#4 Flip the paper over and fold all four corners into the center again.
Fold Opposite
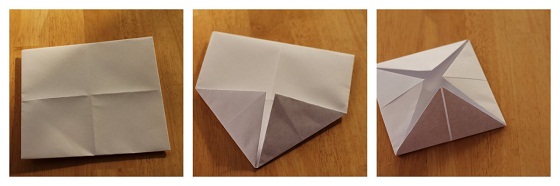
#5 Stamp the insides of the cootie catcher. Since mine is Valentine’s Day themed, I used heart stamps. You can also choose to number this area or to add other text, depending on what theme you are using.

Stamp
#6 Lift up the flaps and write down the ending fortune. Fold the cootie catcher together and start decorating it. I decided to use a punch to give the ends some texture.

Finish Cootie Catcher
#7 Use stickers to add the final touches to the outside.

If you made a cootie catcher as part of your Valentine’s Day crafts, what messages would you put on the inside?
 Cootie Catcher Valentine Day Craft was a guest post from Amanda Long, who blogs about food, crafts, and family at Midwestern Moms. When she isn’t busy caring for her 3-year old daughter, she enjoys reading, crocheting, and browsing the Internet for new project inspiration.
Blog Note: The Chief Blonde was uncompensated for this post. She did receive products to review
I remember these from when I was in school! Wow, this brings back memories! =D
I like the 12 pack of holographic glitter. Thanks for having this giveaway.
This takes me back to my childhood; these would be real fun at an office!
I used to make these things all the time when I was little. Of course, mine never looked as good as this one, ha!
Dawn
I like the idea of a personalized Valentine gift.It keeps things original after many of decades …
Cootie catchers were always a favorite as mine when I was a kid too. This is a great one and I loved how it is decorate.
Those are adorable. I had to chuckle when I read the title and saw the pictures. I so remember those as a kid. I’ve even seen my girls bring them home! I need to go check out some Valentine’s day craft kits at Michael’s this week, Thanks for the reminder.
That is so adorable! And cute!
What a cute cootie catcher to make! Leave it to Martha and her company to bring some class to a school yard staple.
What a cute craft idea. The kids will love it.
That is so cute! Love it! My kids make those often and they crack me up. Although they focus on Star Wars themes. Silly boys. This would be fun to make for Valentine’s Day!
Look how pretty! I wish I was crafty! But I can follow directions 🙂
Very fun!
That is too cute. Thanks for sharing.
This made me laugh so hard! I’m definitely making it for hubby, as a surprise! Thanx for the detailed instructions.
That looks so easy. This is a great post for my kids to see. They are girly and crafty so great idea. Thanks! You make it look really simple.
Aww, I remember these from my childhood; too cute! If I made one,what it said inside would depend on whether it was for the kids to play with or whether I wanted to use it as a “bedroom accessory.” 😉
I used to love those when I was a kid.
I just love this! You brought back so many fun memories from childhood for me. I want to make one!
fun fun fun!!! i remember playing with these for hours and hours. seems like this generation misses the simple stuff..they are too busy on their electronics!!
I am your newest follower. pls follow back if you can.
I am going to do this today with my kids!
Thanks for the memory! I will use this with my lover so all the messages will X-rated so I’ll not share.